
This post originally appeared on another external blog in 2016. That other blog has since been abandoned, so I am re-posting it in its entirety here now.
Hi, I’m Kimberly from Eat the Evidence, and I specialize in coming up with wacky cake and cookie projects for kids and decorating beginners. One of my most popular tutorials is how to make your own fake, edible, chocolate-flavoured blood for Halloween treats, so for a collaboration with Raise A Mother, I’m very excited to my bring my 3D filled cookie techniques to a whole new audience.
On Eat the Evidence, I often use a special pan covered with semi-spheres to make dome-shaped cookies that can be filled with candy, the fake blood, or other fillings. But I know not everyone has access to or interest in buying such a device. So for this article, I’m going to show you how to use basic kitchen tools to still be able to create filled cookies, explaining everything at a beginner-friendly level with lots of options so you can create with confidence.
Let’s make some filled 3D tombstone cookies!
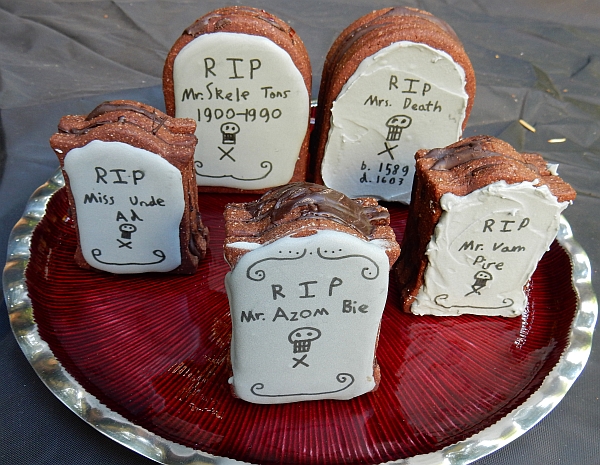
These are made by stacking several identical cookies together with the middles cut out of the inner cookies, creating a hidden cavity. They’re sealed together with chocolate and decorated on top with icing and edible ink markers.
Time Required:
This is a weekend project with long breaks between stages. Dough will need to be made and chilled, then rolled, cut and baked, the cookies will need to cool, and you will need the royal icing to dry overnight before you can write on it. Depending on your kids’ ages and craft levels, you may want to do some parts like mixing and/or baking the cookies on your own and just let them decorate, or if you’ve got budding bakers you can have great fun doing it all together. For the photos, I made the dough myself on a Friday evening, then cut and baked the cookies myself Saturday morning, then let my 11 year old do all of the assembly and decorating on Saturday afternoon, and then let her write on them Sunday morning.
Supply List
Food:
Cookie dough of your choice (see notes below)
Fillings (fake edible blood and/or small candies of your choice)
Royal icing
Chocolate chips/chunks for melting
Tools:
Standard cookie baking equipment (ie baking trays, spatula, mixing bowls, etc.)
Tombstone shaped cookie cutters or equivalent or a template and knife (see below for details)
Piping bag (can use a small zip bag and snip tip off)
Edible ink marker in black
Small silicone spatula
Cooling racks (for cookies and to have a drip tray)
For this project you’ll need a cookie dough that doesn’t spread too much when baked, and that will in part depend on where you live because different types of wheat, butter, and other ingredients can make a recipe vary widely in outcome. In the photos below I’m using the UK version of my Dark Chocolate Rolled Cookies recipe (which also has a good, low-spread US version right there on the page), but sugar cookie dough or gingerbread would also work well especially if you lower or omit any baking powder called for.
The reason you don’t want too much spread is because you’re going to be making several cookies with the same shape and some middles cut out, so if the dough spreads too much they won’t line up well or may fill in the holes you’ve left for a filling. If you’re going to make these with your kids as a fun weekend project and the cookies come out uneven, that’s not a big deal because I promise your kids will help you eat the evidence that anything went wrong! But if you’re making them for an event where the results matter and you’re not sure about your dough, simply make a test batch beforehand; cut out some dough using a cutter, then compare that cutter to the baked cookie to make sure it hasn’t spread too much or changed shape. Again, I guarantee you that you’ll have no shortage of volunteers to help consume any extra cookies.
You’ll also need some cutters. In the photos below I used a Wilton gravestone cutter and two FMM arch cutters. The first is fairly cheap and the second is more of a professional level tool made for fondant, but I wanted to show you that you can use a variety of cutters to get a good end result, as long as they’re big enough to allow for a cavity inside.
You can also do a Google image search for “gravestone outline” and pick one you like to use as a template. Simply resize and print the graphic to be at least three inches wide, print, cover both sides of the printout with clear packing tape, and then cut it out. Voila, you now have a greaseproof template! Put that on your rolled-out dough and cut around with a knife or pizza wheel. Obviously if your kids are too young to handle sharp tools, you’ll have to do this part yourself.
Once you’re set up with chilled dough and a way to cut it into the shapes you want, roll it out to about 1/4”. You want a thick cookie so you get good height to fill, but not so thick that it won’t bake (if your recipe calls for thinner cookies, adjust your baking time accordingly). It’s important to roll your cookies to a consistent thickness, so if you’re going to make cookies often I’d recommend getting some kind of rolling guide. These come as bands to fit specific rolling pins or sticks you roll along on either side of your dough. An ultra-cheap method is to grab some 1/4” dowels from a craft store and roll along those. But again, if you are just playing around with your kids, it’s okay to just roll them out without guides and just try to go for 1/4” the whole way around on the dough.
Work with small batches of your dough at a time while keeping the rest in the fridge so it stays chilled, then as you bunch up what’s left after each cutting, add another chunk of cold stuff from the fridge and knead it all together. This will keep the dough cold and stiff to better hold the cut-out shapes.
For sugar cookie dough, sprinkle a bit of flour on your rolling surface and the top of the dough so it doesn’t stick. If you’re using chocolate dough, sprinkle cocoa powder instead; that keeps the cookies nice and dark and extra chocolate is yummy!
For each filled cookie you will need two solid cutouts (one for the bottom/back and one for the top/front), and then one or two middle bits depending on how deep you want the cookie to be; two deep in the middle is good for candies, one is fine for the blood.

Cutting out gravestone shapes using the Wilton cutter on chocolate dough, and the board is sprinkled with cocoa so the dough doesn’t stick.
Start by cutting out the solid backs and fronts, then cut out as many as you need for the middle and use either a knife or a smaller cutter inside to create an opening for the filling. If you find that cutting out the middle is mushing the dough too much and changing its shape, you can cut the middle out with the cutter still around the dough to hold it in place. Be sure to leave at least 1/4” of border around the whole cookie.

I cut these rectangles out of the middle using a sharp knife.
If your cutters happen to be the same shape in different sizes, you can easily cut out matched centres. The FMM arch set is great for this because it even comes with a spacer bar to keep it all lined up for you. You just use the bigger one for the solid cutouts and then pop the smaller one in place for the interior cookies.

If you’re going to make a pile of these cookies for a party, this gadget saves time and might be worth buying. No, I don’t get paid for saying this; I just like the set.
Place your cookies carefully on the tray to ensure they don’t get distorted (tip: place the cutter gently around the outer edge to nudge it back into shape if needed). To minimize spread, chill your tray for about 10-15 minutes, then bake according to the recipe’s instructions. You may need to add a bit more time because of the chilled tray.

The baking tray with a full set of arch cookies and two middle gravestone cookies. I find it’s useful to bake them in sets as much as possible to help me keep track of how many fronts/backs/middles I need.
Make sure the cookies have cooled completely before proceeding to the next step.
Meanwhile, you can prep the fake blood recipe if you’re using it, as well as the royal icing for the fronts. You can buy pre-made royal icing, a mix to which you just add water and then whip at high speed in a stand mixer or with an electric hand mixer, or you can make your own if you’ve got a favourite recipe. If you don’t want to deal with royal icing, you could also use fondant (roll it out thinly, cut it with the same cookie cutter, and stick it to the top cookie with a bit of corn syrup/golden syrup thinned with water). Whichever you go with, tint it light grey with a bit of black food colouring.
The assembly and decorating tools you’ll need are shown below:

Chocolate to melt to glue cookies together, cookies, a drip tray made with a wire rack over a plastic-lined cookie sheet, edible ink marker, grey royal icing in a piping bag stored with a damp cloth over the tip so it doesn’t dry out, fake edible chocoblood, pack of Smarties candy.
You can assemble the cookies with either royal icing or chocolate if you’re filling with candies, but to fill with liquid such as the fake blood, you need to seal the whole thing up so it doesn’t seep through gaps or through the cookies themselves. So in this example I had my child do all of the assembly with melted chocolate.
First I had her decide which cookies would have blood inside since those would have the most chocolate on them and take the longest to set up. We put a bottom, middle, and top on a little work board and flipped the top cookie over.

She spread chocolate all over the bottom cookie right up to the edge.

Then she put the interior cookie on the bottom and lined the edges up so they were even all around.

Then I had her put more chocolate into that opening and spread it all around, including up the sides of the well. This is to make a chocolate seal around the entire inside of the cookie.

Then we put those two layers upside down on a drip rack fashioned from plastic wrap on a cookie sheet with a cooling rack on top. Excess chocolate drips out of the well of the cookie, leaving it coated inside but still with plenty of room for filling.

Then she spread chocolate all over the overturned top cookie and set that to solidify as well, and then repeated the procedure with all of the cookies destined to be filled with the liquid fake blood.
For the candy filled cookies, you don’t need to cover the whole interior surface with chocolate; you only need to put on enough to glue the layers together.

She’s put just enough chocolate around the outer edge of the bottom cookie to stick the next layer on.
You really want an extra middle cookie here to make it deep enough to hold several candies, so put more chocolate around the edge of that first middle cookie and then stick on another middle cookie.

Set that aside for the chocolate to firm up completely. If you’re making a lot, probably by the time you’ve assembled all of your cookies the first ones will be ready for the next step. If you need to pop them in the fridge briefly, you can, but don’t do this right away with the ones you want to drip out first.
For the blood-filled cookies, spoon or pour in enough of the blood to just underfill the well as shown.

Then carefully put another line of melted chocolate around the top edge and put the top in place, chocolate-covered side down so you’re surrounding that liquid centre in a complete shell of chocolate.

Don’t forget to make time for silliness, like pretending you’ve cut yourself and licking it off (and then washing up, of course!).

For the candy-filled cookies, put your candies in first, taking care that there’s a bit of room at the top so the top cookie will sit flush. Spread some chocolate carefully around the edge and put the top in place. Try not to let the chocolate drip down into the candies because it will make them stick in place. This is also why you should put the candies in first, because if you put the chocolate on first and then pour the candies in, you’ll probably get candies landing in the chocolate.

If you’re doing both blood cookies and candy cookies, expect the inevitable question, “Can we put BOTH in ONE COOKIE?” I said sure, knowing that the liquid would probably mess up the candies at least a little bit (some candies might melt entirely), but who cares…it’s Halloween goopy fun!

Once the cookies are all assembled and the chocolate holding them together has solidified, it’s time to start decorating! Fill a piping bag or plastic sandwich bag with your grey royal icing and snip a very, very small opening at the tip/corner (start small and go bigger if you have to). Pipe a border around the cookie first, a little bit in from the sides (you may wish to pipe some guide dots for your kids to connect), and then zig zag to fill in the border. Use a toothpick or food safe needle tool to spread the icing around.

You want the royal icing to be thin enough to flow when piped onto the cookie. If it’s too thick you’ll have to spread it, which makes it harder to get an even coating (although my child said she liked the rough, stone-like way the spread icing turned out).

The thick icing shown on the left doesn’t get as smooth as the lower two shown on the right.
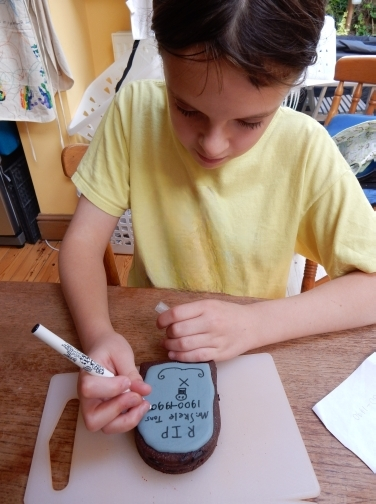
Let the icing dry overnight, and then the next day you can write whatever messages you like on the cookies! My child opted for puns in the names, and I helped her draw some curled lines on them as well.
Soon you’ll have a graveyard full of deliciousness!

Cut through the cookies with a sharp knife (an adult’s job!) to make them bleed, spill out candies, or both.

And then eat!


