
I went to the Sugarcraft Southwest event hosted by Region 6 of the British Sugarcraft Guild on April 18, 2015. This was my first BSG show so I wasn’t sure what to expect and had to pester one of the organizers repeatedly with rules questions – Corran says I’m a disruptor in cake space – but it all paid off because I won not only a Gold but the category trophy!

My entered piece, six cupcakes representing Jack and Jill on a fondant-covered foil base. The ticket in front says Gold and Trophy.
I didn’t actually bring the trophy home because it belongs to their division and I’d have to return it by sometime in the fall, but I gather that this was very prestigious to win it at all, especially as a newcomer.

Presentation of the certificate and trophy by British Sugarcraft Guild Honorary President Steven Kirkby.
The category I chose was Nursery Rhyme Cupcakes, which required six cupcakes that clearly demonstrated a single nursery rhyme with each cupcake being different. I figured small items would be easily transportable on the 4.5 hour drive to Taunton from Cambridge. We’d also decided to use the show as an excuse for a family holiday the week after to go down to the Dorset coast and rent a National Trust cottage, so I didn’t want to take a piece that would have to come with us afterwards.
I decided early to do Jack and Jill if the rules could accommodate a display base shaped upwards as a hill. The rules specified no artificial decoration on the cupcakes themselves, but a show organizer confirmed that a built up foil base covered with fondant would be fine.
I thus shaped some foil so that I could position six cupcakes in green wrappers at various levels in a dynamic fashion. I started with the foil loosely crumpled and then gradually squished it tighter as I formed the piece, even banging out very flat platforms for the cupcakes using the blunt, heavy handle of a screwdriver.

Checking the position of cupcakes on the foil hill as it was built.
Once I liked the shape, I used a glue gun to affix it to a green foil board and decorated it, starting with some brown patches where I wanted an exposed-cliff effect.

Adding chocolate fondant to the exposed sides of the hilltop.
After that I covered the rest in patches of green blended together, with cut edges to look like grass hanging. I didn’t make hatch grass marks all over because that always looks amateurish, like hack-mark hair. You want to suggest fine detail, not enslave your piece to it.
When I talked to a judge, she said she had to think to come up with criticisms because they’d all liked my piece so much, so she suggested that perhaps I should’ve used a thicker drum and covered the whole board. I heard the same about my Birmingham NEC show piece, so I think I should probably start doing that.
Since I don’t have my airbrush here, I tried to fake it with a sort of sponge-painting-type look with green food colouring (the stuff I bought here is terrible and I can’t wait to get my Americolor back!) on the green fondant, and then dusting the whole thing with green and yellow to take off the shine. The judge said they weren’t keen on the effect and suggested marbling multiple shades of green instead, in lieu of an airbrush which we agreed would have been much better overall.
I also made many tiny flowers (more on those below) and stuck them all over, trying to replicate the spring look of the fields around England in early April with spots of colours everywhere from wildflowers in every meadow.

Completed base from the back.

Completed base from the front.
For the cupcakes themselves, I needed to build the figures in my limited child-free time on weekends or occasional late evenings, in part because in order to make them with no internal foil or wire supports I had to let them dry between building stages. So I made six fondant circles sized to the top of the cupcake wrappers, cut with a fluted cutter to replicate the edges of the wrappers. I dried these and sponge-painted/dusted them in the same manner as the grass on the base.
With two characters and six cupcakes, it at first seemed natural to do three versions of each. But since I wanted both Jack and Jill on the top of the hill with the well, that meant I either had to do a fourth version of one of them or find something else to do on one of the cupcakes. I decided if Jack carried a bucket up the hill and filled it at the top, it was within the story to have the bucket on its own tumbling down the hill. I then realized that this would allow me to do some really cool effects with suspending the bucket up in a very dynamic pose with gelatin/piping gel water pouring out.
So I drew some rough sketches and set to work, building the figures up bit by bit. I knew I’d need to lean characters on the well, so I started it first by making various shades of red bricks using my sugar shaper tool and the square die.

Making and drying tiny bricks.
I let them dry for about 48 hours and then used very softened bits of white fondant over a few evenings to mortar the bricks together around a red base. Royal icing would have been faster but I don’t have a mixer at the moment so I decided fondant would be better than trying to hand-whip a tiny amount of royal icing.

The white fondant here is wet to the point of being goopy so it can be easily smoothed together with my fingertips.
I put a blue base inside the well so that the later piping gel would show that tint instead of appearing very dark against the red. After an initial layer of lightly blue-tinted piping gel was put in and allowed to set up for a couple of days, I put a second layer of gel in along with the pre-dried bucket. This way the lower, firmer gel would keep the bucket from just sinking in, but I still had softer stuff to carefully push up into the bucket to give a dynamic, scooping effect to the water.

Note that Jack’s arms and the handle aren’t on yet. That’s because the piping gel and the bucket will actually be used to support those other elements. This meant the bucket had to dry firmly in place first. This is the sort of deep planning required to pull off a highly detailed piece without internal supports.
For Jack I started with teeny tiny feet mounted onto legs and let those dry in place with supports where necessary.

For this Jack, the only points of attachment would be one flat foot and then a partial foot behind. That meant it had to dry on firmly or risk the whole piece breaking. Being able to use toothpicks or a wire armature helps, but since that was forbidden for this contest, I had to make extra-sure to get these feet on right.
I decided right away that I wanted Jill to be very little, almost a toddler, and to give her pudgy legs and dimpled knees like my daughter Robin has. I shaped some little torsos in white, more or less like little sleeveless onesies, with leg holes in the bottom and a spaghetti-sized hole at the top for a later neck support. I let these dry solid for many days.

One of the three Jill torsos dried and in place with little kneeling legs. Most of these legs are not seen in the final piece, but it’s important for competition to assume that something but be seen by a keen-eyed judge! So I always fully sculpt interior portions that might show under the ruffle of a dress. You don’t want to get to the point of adding a dress just to find out that your misshapen uni-leg actually shows.

The “tumbling after” Jill’s lower half, with the pre-dried torso supporting legs in the air and a flowerpaste skirt. The other supports were temporary so the legs didn’t slump as they dried into place.
After using flour vermicelli straight from the bag for my NEC entry, I wanted to try working with it boiled enough that I could bend it into shape and also experiment with dyeing it. I decided to give Jill braids to allow for experimentation in this regard. I broke some strands and put them in a shallow dish with a bit of water and yellow food colouring, and then microwaved that for 30 seconds. It came to a boil and the noodles softened. I then laid them out three at a time on a little modelling silpat I bought from Ruth Rickey and braided them.

This was ridiculously difficult!
I used the mini PME hook-shaped tool to scoop up each end as I went down the braid, but the noodles were very slippery with more and more starchy goo developing with every touch. I couldn’t cinch the braid snug at all as one does with yarn or hair because if I tugged at all, that noodle would slip out from the other two entirely. I also couldn’t pin down the ends because they were too fragile and would just squish and break.
But after some practice I finally got several braids, all much longer than I needed. I made sure I had allowance for breakage and for part to be embedded in the hair for strength, especially on the ones that would need to stick up into the air for Jill’s falling scene. I made sure those ones were long and curved so they could come out from underneath her head to stick up as if she’s just landed on her back.

The key is to do longer than you need because you can’t maintain tension on the ends. Position the braids how you want them to dry.

The vermicelli shrinks a lot when it dries. Here is one of the braids compared to a US penny and a UK 5p coin. It appears to be a smiley face because it is mocking the fact that I keep thinking those 5p coins are dimes, because I haven’t mastered UK change yet. It’s also trying to lure you into trying this technique with the pretense that it’s easy and fun. It is neither.

Braids and stems drying along with extra bits just in case.
Later, I carefully broke extra ends off to get them to the right size (although the curved ones technically are longer than the straight ones, so Jill has a bit of a Dorothy’s Braids Blooper going on), and added tiny blue fondant loops on the ends.
I also did the same small-boil method with a bit of black food colouring to make grey noodles I could then bend into pail handles. I made many in case I lost some to breakage, and thought if I made them angled enough I could trim them as necessary to fit the pails I’d already moulded and were dry.

The original pail handles, still wet.
Unfortunately, I didn’t realize just how much the vermicelli would shrink when it dried. For the braids this was great because it made them even more tiny and delicate-looking (even though they’re actually reasonably strong, especially when compared to any similar-sized string of icing), but for the pails it meant all of my angles were off and none of my original handles were big enough for the buckets. So I had to make a bigger second set with some seemingly far too big just to ensure I’d definitely have some since time was getting critical. Luckily some within this second set worked. I put tiny balls of very wet grey fondant on the sides of the pails and stuck the handles in place, then let the whole thing dry up.
I also made many little tiny green stems with vermicelli, but didn’t boil it in that case. For those I just dabbed them with some green food colouring gel. Then when I had some mini flowers ready and dried, I used a tiny bit of very wet green fondant shaped into a cone, pinch-smushed onto the backs of some flowers, and then poked the green stems in and set them to dry.

Jill’s surprised head firming up beside some of the mini flowers mounted on vermicelli stems. I hung the flower edges over the carved edge of this wooden cutting board so they’d dry straight with no pressure on any side.
While most of the little flowers on the base and scenes are simply stuck on directly, the ones Jill would be holding needed to have stems showing, so I thought it might make more sense if the first Jill was kneeling beside a particularly thick patch of grass and flowers. I made grass using one of the multi-hole openings on my sugar shaper gun and created an initial central tuft, pinching the tuft inwards at the bottom to tighten it up and give a good seat to the first few stemmed flowers poked into it.
One of the important things to consider when carrying a story element through multiple pieces is to make sure the element matches all the way along. This meant I had to ensure that there were flowers in that first patch that would match the ones in her hand by the well and then match the ones being dropped as she falls. So to start I selected mini flowers in matched sets. For the first scene, I then added extra to imply that Jill was choosing a few from a set.

The finished version of the first Jill where she’s picking flowers. Three of them are duplicates carried through the story.
A recurring problem in modelling is that if you poke something rigid into something soft and move the rigid thing at all, the hole in the soft medium widens very easily and no longer supports whatever you poked in there. Thus it is vital to poke once with confidence and not move it. In this particular case, the stems were so delicate that moving them around would risk breakage as well.
So once I had those first few flowers in, I started building up the grass with more little tufts, each one pressed gently inward to help mush the hidden interior into a tighter mass around the stems.

Securing the flowers with tufts of grass part 1: I’ve just poked in several of these. Note that I have only put one of her arms on at this point. This gave me a guideline for positioning the flowers within her reach but kept one arm out of the way so I didn’t accidentally break it off while putting the flowers in place.

Part 2: here I’ve added a tuft of grass and pushed it in and downward to secure those flowers.
By doing this repeatedly around and carefully checking every part after each insertion for movement and alignment, I was able to create an outward-looking delicate arrangement with a fairly solid interior.
For the flowers in Jill’s hands at the well scene – where I wanted her casually holding them behind her while she smiles up adoringly at her big brother – I totally cheated by using multiple stems instead of actually having contiguous stems poke through hands. It’s hard enough to model hands on this scale; having to then insert stems through or fold fingers around or any other manipulation pretty much guarantees mushed fingers. So instead I made the hands, let them firm up a bit but not dry completely, and then inserted two of the flowers coming out of the top and two other stems coming out of the bottom. This wouldn’t have worked if the stems had been required to appear straight – as in if she’d been holding a baseball bat or a rolling pin – but since it stands to reason that a toddler would tightly grip and thus mash any flower stems they manage to collect, bent stems not only made my life easier but fit the story well.
Or at least, that’s the story I’m sticking to!

The finished well piece looking at Jill from the back so you can see how I cheated with the stems.
For the third scene I wanted it to look as if poor Jill is losing her flowers into the air as she tumbles, because for a toddler it’s always a greater tragedy to lose one’s treasure than to sustain a bit of an injury. However, as good as I am at cake decorating, I still haven’t figured out how to suspend things in the air without supports. Confined as I am to the laws of physics and the gravitational pull of the Earth, I was thus forced to find other ways to suggest this motion of flying flowers.
I decided having one on the ground already but stem up as if it’s still in the act of landing would work. For the other, I affixed it to Jill’s open palm as far up as I could (it kept sliding back down) to suggest that the thud of her landing has finally made her lose her grip on that last precious flower.
Also in this scene, I used the aforementioned curled braids along with elevated legs kicking out from a flying-up skirt all to indicate motion. The braids were stuck down underneath the head to hold them in place.

Mounting the vermicelli braids for Jill’s tumbling scene. They were pinned down with fondant and then the head I’d pre-dried was put in place, with more hair stuck all around as necessary.

Side view of the completed piece with Jill letting go of her flower as she falls.

Another view showing the flower leaving the hand and the other landing on the ground.

I tried to put as much in the air as possible on this piece: the braids, flowers, her arms and legs, and her skirt, all to suggest that she’s in the middle of a tumble.
As for the mini flowers, I would’ve liked to have used a mini plunger cutter because I have one back in the US but didn’t have one here, so I took it as an opportunity to go smaller and smaller with a simple technique as follows.
First, I made a little ball of the main petal colour and pinched it into a disc on my fingertip, making the edges thinner than the centre.

I put the disc down on my work surface and gave it a pat to flatten it a bit more and thin the edges further. Next I used one of my mini poking tools to make five indentations evenly spaced around, or sometimes more, depending on how bored I was getting with one type or the other.


Then I picked it up, put it in my palm, and used the mini ball tool to gently indent the middle.


Then I set them to dry and later put in whatever centres I wanted, sometimes a simple contrasting dot of fondant, sometimes a dot with a hole poked in the centre, and sometimes other various tiny pieces. Again, my goal was to make it look varied and to not get bored doing it.
I also made some tiny cup flowers, some tapered, marbled-paste flowers with indentations on the sides, and a few teeny tiny rolled-rose type ones, but those were so fiddly that despite liking how they looked, I just didn’t have time to keep making them. The ones I’ve demonstrated above are really quick by comparison.
Getting back to the figures, I continued to build them up with supports as needed. I considered a few different hair styles for Jack but eventually decided that his hair should be fairly simple and short in the first two scenes, but messy in the third where he’s taken a tumble. I also mentally went back and forth on the literalism of his broken crown, since obviously that means he’s cracked his head. But since many portrayals show a figurative crown and since I couldn’t exactly show him with a broken skull without getting really gory, I decided the figurative crown would help emphasize the iconic line of the rhyme.
I tried some different methodologies for making the crown but most turned out too chunky and goofy-looking, so eventually I went for a simple thin circlet, indented along the top, dabbed with a tiny bit of red food gel to simulate gems. I pre-dried the broken one so it could sit askew on his head with the other bit on the ground. The judge I spoke to said it was too bad that piece had been damaged, but I said it’s part of the rhyme so she replied, “Oh, right! It’s the broken crown!†Hopefully I didn’t lose points for that misunderstanding!

Detail of Jack’s messy hair, piping gel tears coming out over his hands, and his broken crown partially on his head and partially on the ground behind him. Note that underneath those hands is a fully sculpted crying face because again, you can’t tell in advance what bits might show through so for a competition piece, always sculpt stuff even it it might be partially hidden later!
For the water scene, I wanted to really emphasize the tumbling motion of Jack’s dropped bucket spilling out all over the place. To achieve this, it was important that the bucket appear to be in the air, but once again I had that slave-to-actual-physics problem. So I came up with a design where the bucket would actually be held up by hardened gelatin that was then covered in piping gel rivulets.
I started with a curved bit of dried gelatin saved from an earlier piece. I painted it with piping gel enough to give it the start of a poured texture, but not so much as to completely soften it. I positioned it and put some supports in place and then let it dry for several days.

The early stage of the water scene with a dried piece of gelatin coated in fresh piping gel and held in place to dry there.
Once it was firm, I added the pre-dried fondant bucket on top and painted on more piping gel, including making sure there was lots up inside the bucket to really stick the whole thing together. I supported the bucket in place while it dried, also for several days.

Adding the bucket and more splash detail to the water scene.
I added another very small piece of hardened gelatin to the back on an angle just to be sure that the whole thing wouldn’t slowly sink down, and I added more painted layers of piping gel all over, including pulling out droplets at the end of the splash points.
When it was all solid, I added the vermicelli handle to the pail as described above and put some of the mini flowers all around.

Finished bucket scene from the side, showing the back-angled bit.
The amount of water is probably more than would technically have fit into the bucket, but I didn’t know what the lighting would be in the competition room and I knew from past experience that poor lighting can make gelatin/piping gel sort of disappear into the background, so I decided it was better to have extra water splashing all over and assume the judges were probably not adept at calculating the volume of fluids in apparent motion.
Here then are views of each of the six toppers fully completed:

Jack going up the hill.

Jack going up the hill, rear view.

Detail of Jack carrying his bucket up the hill.

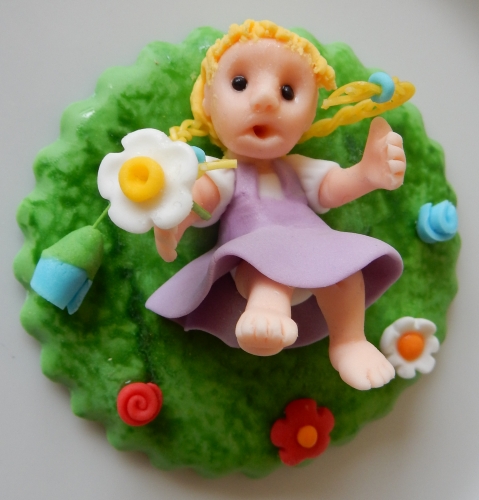
Jill going up the hill, pausing to pick some flowers.

Detail of Jill’s braids and kneeling feet. I wish I could’ve got the fondant hair colour to exactly match the vermicelli hair, but boiling the vermicelli made it slightly translucent, a quality that can’t be copied in fondant, so I had to go with “close enough”.

Jack and Jill at the top of the hill, fetching their pail of water. Jill is looking up adoringly at her big brother.

Jack smiles back at Jill up at the well.

Detail using a flash to show the piping gel water in the well with waves sculpted on to make it look as if the water is being scooped into the bucket. You can see here what a difference the hidden blue base inside the well makes. Without that, any lit view of the well would’ve looked muddy.

Jack fell down and broke his crown. He also lost his bucket.
And Jill came tumbling after.

The bucket falling behind Jack and Jill, shown from the front.

The bucket from the front-side taken with a flash to show the piping gel “water” inside.

Full bucket scene from the side.

Detail of the bucket from the back.
Then I packed up all of these delicate structures into a box, ready to go to the show! Yay! Well mostly yay. There was that whole part where a few hours after packing these up, I was in the hospital thinking my baby was dead. She wasn’t. More on that in a separate blog post over here.
But once everyone was back to relative health, I carried this box on my lap for the drive out to Taunton.

All of the pieces separated by ruffles of packing foam. You’d be amazed how many people make fantastic cakes but completely fail to think about how they’re going to get them to a show!
I also had two full trays of cupcakes made from my new favourite BBC recipe for chocolate cake, plus a ziplocked baggie of ganache to pipe on so I could put the toppers on the cupcakes at the show. And it would’ve worked too if it hadn’t been for that pesky frigid weather! I had a terrible time getting the ganache to go smoothly onto the cupcakes, and even with warming it with my very hot hands, it sat in a lump on top of each cupcake. Time was running short so I had to give up and go with the toppers higher up on the cupcakes than I would have liked, and the judges noticed and remarked on it.
Further, I’d originally planned to put an extra cupcake liner around the baked cupcake so make it a brighter green without that greased-through look, but because the cupcakes had come out fairly compact compared to the un-filled papers, putting the papers on looked very sloppy, so I didn’t do that. That meant the cupcake bottoms were darker and messier than I originally planned. The judges didn’t remark on that, though, and given that the cupcake papers had to show (ie you weren’t allowed to put any die-cut or other wrappers around), they were probably anticipating some amount of cupcakes actually showing.
This was also a tasted entry; the judges took one of the cupcakes, cut into it, and actually ate some. That’s why I went with the nice chocolate recipe instead of a bog-standard box mix, and why I went with nice ganache. Actually, if I’d had access to a stand mixer I might’ve made my dark chocolate buttercream instead because that would have been softer than the ganache. But as it was, the judges said my cake and icing flavour were wonderful and that they liked that it wasn’t overly sweet. That was a nice change, since I’d otherwise given up on entering tasting competitions since I made dark, rich stuff and experience has taught me that most judges want super-sweet stuff.
So here are photos of the whole thing assembled at the show:

The entire display from the back.

The entire display from the front.
Side 1.

Side 2.

From the top.
Here are my award and judging comment sheet:


My judging comment sheet. I agree with 100% of it and was glad they liked the dark flavours.
Because we were about to go on holiday after the show and the toppers had been placed on actual ganache that would go off after a few days, I didn’t want to take the entry with me and was going to throw it out. But the lovely folks from the Torbay BSG branch adopted it instead to take to their next meeting a few days later. I hope they enjoyed it!
Peo also entered a cake into the Down on the Farm Cake Topper competition for kids. Here’s her entry:

The farmer in the back is scolding a goat and the one in the front got his head stuck in a pumpkin.

Rear view of Peo’s entry.

Peo showing off her Certificate of Merit.

Peo’s judging sheet. It’s probably my fault about the foil since I suggested Peo do that for the barn because she wouldn’t have had time to let anything solid dry and her skill set/patience isn’t up to building dried walls of fondant to assemble. As the judges correctly remark, she has good narrative structure but doesn’t take time on details. But she’s only 9 and working out that she has to put in effort if she wants commendation. I think it’s great that BSG judges leave honest but encouraging comments for kids!
Here was the second place entry in my category:

By Indika Jayasena, who received Silver. I love the monkeys!
And here are some photos of other items of note, identified with credit where I was able to discern the creators.

Yeovil branch entry table, main Alice in Wonderland cake. This won the popular vote and it is very nicely done, but I personally prefer not to see use of printed images on competition cakes. Still, this is a nice application of the images.

Detail of the printed images from the above cake. Hand-painting them would be very hard, but also very impressive, so if these had been hand-painted I really would have been wowed.

Peo loved this figure from the above Alice in Wonderland table.

I voted for this Jack and the Beanstalk display by the Tamar branch because I thought it told the best overall story of the three voting tables. I am a sucker for a cake display that has dynamic figures and a unified depiction of something going on over and above a collection of objects, and this display is definitely a detailed depiction of this classic fairy tale!

Look at this garden full of tiny veggies!

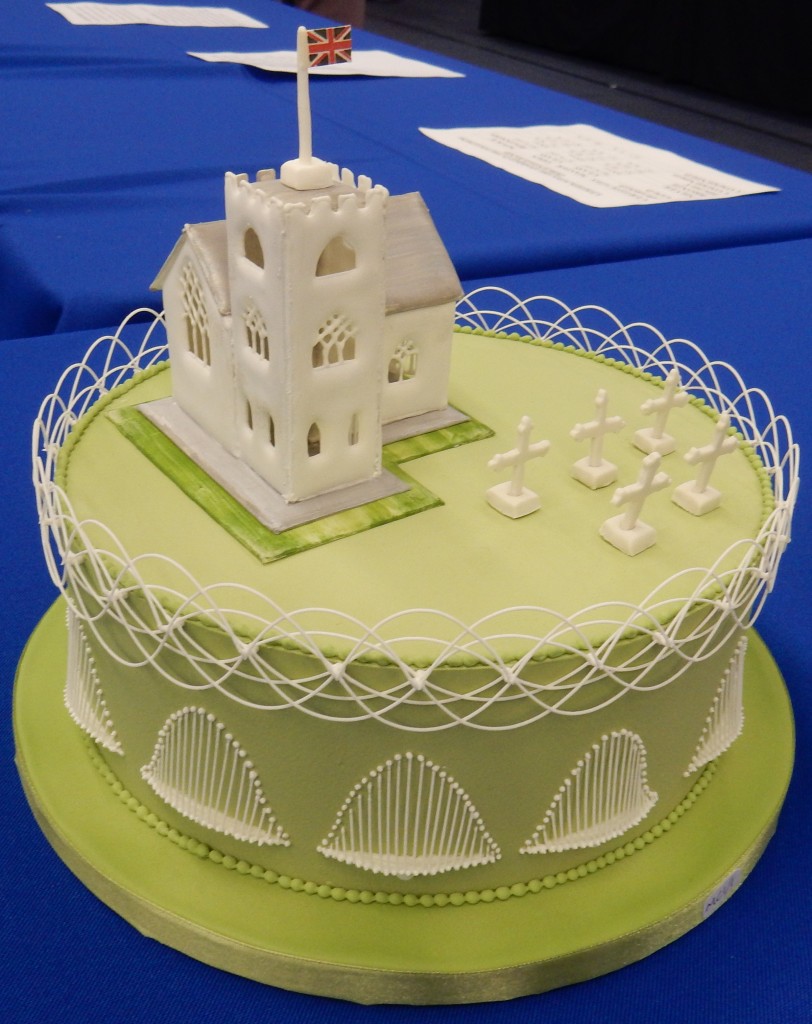
And this house! It’s adorable! Plus it gives a starting point for the story that then literally carries across to other elements.

They even made a little goose with little golden eggs!

The sign was a clever way to also highlight the progression of the story, and in the background is an adorable hen house.

Detail of the other side of the sign post.

There’s even a giant peeking over the background board. What a great way to bring the whole story into one piece! I thought this was very creative, an excellent use of the foreground and background space, and a great way to communicate the scale differences without having to build in the whole giant. Bravo Tamar club!

I forget which branch table this was from, but I just loved this little lizard, camouflaged against the bark. It looked real.

This was also from another branch table, some pretty, tiny, delicate flowers.

A stopwatch piece with a gelatin front cover by Peter Morgan. Very nicely done with the gelatin, without any bubbles to be seen! This won Gold and Trophy in “Freestyle – What’s the Time?” category.

I think this is also by Peter Morgan and got a bronze in the Fairy Tale Wedding category.
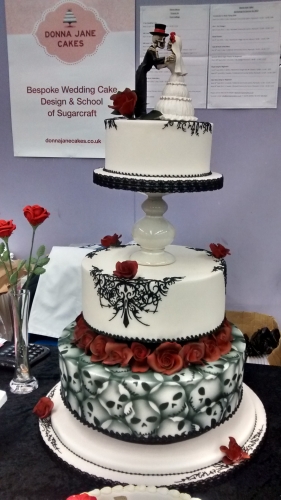
Peo said she thought this goth wedding cake was spooky but I really liked it, especially the airbrushed overlapping skull motif at the bottom. This was at a vendor table for Donna Jake Cakes.

Detail of the skull airbrushing from above.

Some lovely snowdrops from one of the branch tables.
I believe this was the Gold and Trophy winner for “Sugarpaste cake – For The Man In Your Life”, as well as Best in Show, by Tessa Whitehouse.

Other view of above cake.

A wonderfully done wheelbarrow full of veggies on one of the branch tables.

This witch in the figures section amused me. I thought it had a lot of character and was well done. I’m not sure if it placed or not, nor am I certain of the creator.

This is what a table full of fruitcake looks like. I kept thinking, “OMG that’s going to dry out!” because I kept forgetting that this is alcohol-soaked fruit cake. This wouldn’t dry out for ages! They take their fruit cake very seriously here!

A bride’s circlet in sugar flowers. Not sure if this placed or who made it. This reminded me of the one I wore when I had my own ren-style wedding.

Faberge egg on the demonstrator’s table by Steven Kirkby.
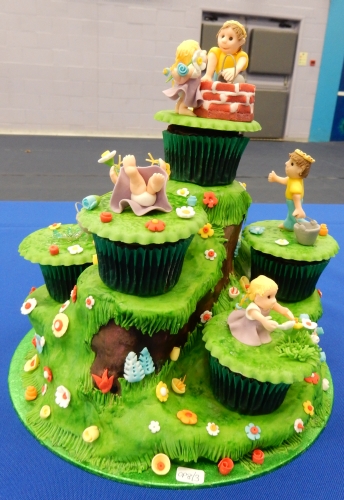
And lastly, here was my personal favourite entry for the whole show, the branch table by the Torbay branch illustrating the same backyard in four different seasons. It was while describing to Peo just how amazing this was in terms of its carried-through story and detail that I ended up talking to some of the branch members, which is how they ended up adopting my piece for their meeting. I was so thrilled when they won the Gold and Trophy for the branch tables because while many other tables were filled with lovely flowers and other items, this was superb not only in detail but again in that all-important story aspect.

The full Torbay display.

Spring, where a shed is being built, a tree is flowering, a garden planted, and a table is being painted.

Detail of the table being painted, down to the tiny paint brush and pot.

Summer with a barbecue, the shed all built, and the tree producing fruit.

Those hand-painted sugar coals almost look like they’re glowing! The creators pointed out that the sausages accidentally fell in the fire, but they decided to leave it like that since that happens if you’re not careful with a real barbecue too.

Check out the detail on that shed!

Now check out the detail INSIDE the shed! Wow!

Someone hand-dusted every one of those leaves and apples. Seriously. That’s AMAZING.

Autumn, with the leaves falling and the garden ready for harvest.

Look at this teeny tiny bird feeder in the autumn tree! There are apparently dozens of hidden animals and other tiny features like this all over the piece. Peo and I couldn’t even find them all because there was so much detail everywhere.

The autumn garden.

Winter. One of the ladies told me that they were upset that they’d had some splitting of the snow on the front end, but with this much detail everyone was willing to overlook that. They clearly still won in spite of it!

Detail of the winter garden, with the remnants of the harvest. This is great.

Side view showing the story progression of the sheds.

Even the title has amazing detail as every letter is constructed from vegetables.
All in all it was a lovely cake event. Thank you to the organizers and volunteers, congratulations to all of the other winners, and I look forward to participating in other BSG shows in the future!
If you think you’d like to take a crack at designing more dynamic figures for your next cake, check out my ebook Dynamic Fondant Figure Modelling. It’s filled with loads of tips on how to make armatures and use your own body to help guide you towards making realistic poses for your figures.


Wow! I’m so impressed by your creativity and craft, especially how you planned out all those complicated dynamic elements. Can you explain to a cake n00b how the Best in Show was determined? It seems a lot simpler than some of the other cakes.
Hi Pedantic Oyster (which is an awesome name, btw!), and thanks for the compliments! That Best in Show cake has very nicely done stringwork, which is one of the most complicated techniques in cake decorating. Those upwards-arced bits of icing are done by turning the whole cake upside down. When they're interlaced with downwards ones, that means turning the cake upside down and back again repeatedly. And getting them even is much harder than it looks.
The church and graves are done with flooded icing and then assembled, and these particular ones were nicely done with clean edges and a good, snug fit.
So while I don't actually know what criteria are used to determine Best in Show (although I suspect it's a combination of a high score and because the judges vote to say it's the best), that cake was excellent and it's not a bad choice.
Nice Work!!
Good one