
I recently did a demo for my local British Sugarcraft Guild chapter about the 3D Candy Filled Cookies I’ve been making, and someone suggested that one could make a turtle cookie. I told her that was a great idea.
And then I went home, made one, and stuck four elephants and a flat planet on it because Terry Pratchett rules.

Technically that’s three cookies: the base round cookie, the dome cookie on it to make the pocket for the candy, and then another round cookie on top for the Discworld itself.
This project was particularly poignant for me not just because of Pterry’s recent passing, but because the first cake tutorial I ever posted online was for a Discworld cake made so long ago that the photos were taken on film and had to be scanned into a computer. Some of you are young enough to not even understand half of what I just said. Just pretend I’m a dinosaur. Rawr.
Anyway, here’s a tutorial on how to make your very own Discworld cookie!
Start by making the base cookie pre-filled with candies of your choice as shown here in the Baseball Cap Cookies Tutorial and have one round cookie the same size as your bottom cookie on the side. In the photos below I happen to have used a completed base that was covered in chocolate on the outside too because I had that leftover from my demo. That’s entirely optional and doesn’t affect the construction of the Discworld cookie.

You’ll need one completed base cookie (comprised of a round bottom and a domed top assembled as per the base cookie instructions here) and an additional round cookie.
To make the underside of the shell, mix some yellow food gel into some Caucasian flesh toned fondant. If you don’t have pre-tinted Caucasian flesh tone, you can mix from white with some yellow, a tiny bit of red or dark pink, and a touch of light brown. The colour doesn’t have to be precise as long as it’s differentiated from the upper shell.

How much yellow you’ll need depends on the strength of the colour you’re using. This brand is pretty weak so I had to use a lot. Go a little at a time until you get the shade you want.
When you have a shade you like for the underside, roll it thin and cut a circle wider than your base cookie as shown below.

You want a good 1 to 1.5 cm all around, or about a half inch.
When you’ve got the right size, brush that fondant with water all over, mount the cookie in place in the centre, and then gently fold up sections around where the flippers, tail, and head will be, as shown below.
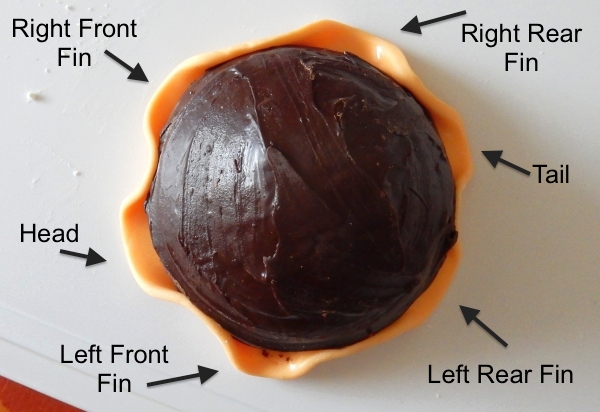
The tail hole should be small with the largest hole for the head directly opposite so it’s easier to start with those to help you divide the rest into sections. The fin holes should all be about the same size and equally spaced around.
The moistened fondant should stick in place on the cookie if you give it a little push at each of the folded up points.
Carefully flip your cookie over into your non-dominant hand so you can use a sculpting tool, a toothpick, or the dull back end of a butter knife to make width-wise indentations along the shell bottom like this:

These don’t have to be perfect and may not even be seen. In fact they’re probably optional depending on how detailed you want to be.
If you are in a very dry environment or have to pause at this point, place the cookie in a plastic bag or tub while you work on the next bit, but on a corn starch dusted surface so it doesn’t stick. When it comes time to insert the fins, tail, and head, you want that underbelly to still be pliable but not to be glued to whatever it’s sitting on.
Take any spare of the underbelly colour you’ve got, add more of the Caucasian flesh tone if needed, and add a bit of brown/chocolate fondant. This will make A’Tuin’s head, fins, and tail, so you need enough make those lumps. Again, this colour doesn’t have to be perfect but by using some of the same colours you already were, it creates a unified palette. OMG I think I almost qualified for an art degree by using those words in a sentence.

Blending the turtle’s flesh tone.
As you mix, you can ensure you have enough by testing out the next step as you go. Make an elongated, thick patty of the flesh tone and cut it into sections with a large lump at one end for the head, four roughly equal sections in the middle for the fins, and a small lump at the other end for the tail. If you do this and it looks like you haven’t mixed enough, add more and remix until it looks right.

Dividing up the flesh tone for the head, fins, and tail. Pre-cutting like this helps ensure you have what you need and won’t run out of your custom colour mid-fin. It also helps ensure the fins all have about the same amount of fondant which will make sculpting the same size easier later.
Next, shape the body pieces. Roll the head into a ball for now. Roll the tail into a short, tapered snake. Roll all of the fins into long tapered snakes, and then pinch out one side to form the fins. Be sure to make two right handed fins and two left handed ones. See the diagram below for how to shape the fins.

Starting from the lower right corner and working clockwise: make a long tapered snake, pinch out one side, flatten the whole thing slightly, then smooth it out and curve the tip towards the back of the turtle.
Place the fins and tail into position on the gaps you left in the underbelly, moistening the body end of each part as you go to help them stick to the underbelly and the cookie. You may need to gently widen the gaps to accommodate the body pieces and then pinch them back closed.

Make sure the underbelly is firmly against the pieces to help hold them on.
Press some of the fondant from the tail and each firmly against the cookie, slightly smushing it in and upwards as you go to really anchor those pieces on.

Work that moistened fondant right up hard against the cookie to make sure it sticks. That’s a lot of weight hanging off to the sides so you need to maximize surface area contact where you have it.
Gently roll the head ball between your palms to give it a bit of a tapered, tear-drop shape.

This forms a bit of a neck but also gives you material to smush onto the cookie because again, you need this connection to be strong.
Use a ball tool to make gentle indentations for the eyes and a sculpting tool, toothpick, or blunt back of a knife to indent a mouth line.

You can make him smiling or not as you prefer. The gap will close a bit as you handle the head to mount in on, and you can also smooth it with your fingertips if necessary.
As with the body pieces before, place the head into position, press the neck end firmly onto the cookie so you’re actually smushing some of the fondant over the cookie itself, and bend the underbelly up around the neck as required.

See how the neck is really pushed and spread onto the cookie to help hold the whole head in place.
Test lift the cookie carefully at this point. If any of the pieces look like they’re going to break off, pinch-smush them more tightly up against the cookie. You will be putting the shell over these smushed sections so don’t worry about how they look, just that they’re a good, tight, strong fit. Because you won’t convert nearly as many people to your new space turtle religion if the turtle’s head keeps falling off. I mean you’ll convert some, sure, but only in a very small god sort of way.
Once you’re sure the parts are on firmly, set the cookie aside on a corn starch dusted surface so it doesn’t stick. Alternatively, if you’re unable to get the pieces to stay on and want to serve the cookie mounted on a plate or board, set it on that plate or board now. This is a good choice for kids or beginners who would be heartbroken if it fell apart when lifted, or if the piece will need to be transported before it can sit overnight to dry (ie if you’re making these at a Discworld-themed cookie craft party, which would be an AWESOME PARTY and please invite me because if you’re the sort of person who would host such an event I want to be your friend).
Next: on with the shell!
You can go with straight green, brown, or whatever colour you think is best. A’Tuin is supposed to have a well-scarred shell from eons of meteorites, but that’s a bit complicated at this scale. I like the look of a marbled shell so I’ll show you how I made this one with various shades of green and brown, but if that’s too complicated go with a single colour.
To mix the marbled colour, start with balls of two shades of green, brown, and yellow. For the green here, I used the pre-coloured Renshaw green but added some green food colouring to one ball to deepen and darken it.

Adjust the relative sizes as desired. Just make sure you have enough that when you roll it out flat, there’s enough to cover the whole cookie.
Roll each colour into several long snakes and line them all up randomly in a row, pressed together, like this:

Some curving will happen naturally since the ends of your snakes are thinner than the middles. Go with it; this will just help add to the curves in the final result.
Use a rolling pin to roll the snakes flat together, rolling lengthwise along the snakes. Fold the rolled fondant back on itself and roll it out again. Do this one or two more times until you have a stripey bit of fondant with the colours starting to blend together.
Gather the piece into a ball but taking care not to overmix. Roll that ball out very thin over corn starch so it doesn’t stick to your rolling surface. Look at both sides and decide which marbled surface you like better and turn that one upwards.

I liked this side because it had some strong brown bits but also a lot of nicely blended yellows and greens.
If you happen to have hexagonal mini cutters, that will make the next step easy. If not, you can just cut hexagons roughly with a sharp knife. Either way, chances are your cookie is not enough of a perfect sphere for hexagons to line up precisely, so you’ll be patching in various shapes as you go. Remember that A’Tuin is a giant space turtle, so nobody’s going to judge you for imprecise shell placement!
Start with a hexagon in the top at the middle (attached with a bit of water or if necessary, a bit of water with corn syrup/golden syrup), and then make six more of the same size and place them around the edges of the first. Gently press them out to fit together as well as you can and where necessary, take a spare bit of your marbled colours and press into place to cover any gaps.
Make more hexagons and work the next row, adding extra bits as needed, and trimming the hexagons as you bump up against the underbody. Pinch the underbody and top shell bits together as you go around to firmly connect them; this will also help hold the fins, tail, and head in.

Start with a top central hexagon and then work your way down to meet the underbody, smoothing the pieces and filling any gaps as you go.
Once the shell is done, you can add final details.
You can bring out the mouth line by painting in a very watered-down bit of brown food gel, and then immediately wiping off the outside area around the mouth. This isn’t required, but can help the mouth stand out a bit.
Make eyes by forming two small balls of white and pressing them into place with a tiny bit of water in the indentations on the head. Then make two very small blue dots, pinch them flat between your fingers, and apply them to the whites with a bit of water. Repeat this with even smaller dots of black, centred on the blue. Then add a single white sprinkle or a tiny dot of white fondant as a highlight to the eye.

Be sure to position the eyes so they’re looking in the same direction or else A’Tuin will look like Cookie Monster. Which is a whole different religion, I’m sure.
For the spots on the head and fins, first put a drop of yellow food gel on a food-safe palette (an old margarine tub lid is perfect for this!). Add a drop of water and mix it a bit, but not completely. Use a brush to dab this rough yellow mix randomly over the head and fins.
Next add a drop of brown food gel and repeat the steps with the water. Using the same brush you had in the yellow without rinsing it, dip it in the brown and dab that on top of the wet yellow spots you just painted. Don’t worry about perfect overlapping: the idea is to have them slightly off-centre so there’s a visible yellow bit and brown bit to each spot.

Note how the spots vary in size and relative amounts of the two colours. This makes them look more natural. It also makes it easy for you to plonk ’em on quickly without worry.
That completes the turtle portion, so next we can move on to the Discworld itself and the elephants!
For the water on Discworld, take some light and dark blue fondant and marble them roughly together.

Use much more light blue than dark so the dark is just giving a hint of waves and not dominating the piece.
Roll out the blue mixture thinly. Lightly place the cutter you used dull-side down on the blue to estimate where the edges of the cookie will be, and then cut a wobbly, wide edge so that there will be “drips” of water flowing over the side of the cookie.

Follow wave lines where they naturally exist to enhance the watery look.
Affix the water onto the cookie using a bit of water and corn syrup/golden syrup.
Position the cookie on an elevated surface that is smaller but still stable so the “drips” can hang down over the edge to firm up. I used a little ramekin. You could also use a bowl, a cup measure, etc. As long as it’s not going to fall over and still gives room for the “drips” to hang freely.

It’s okay to leave bits of the cookie edge exposed and other bits over-covered. That enhances the look of water flowing over the edge.
Refer to a Discworld map to make an approximation in miniature on the cookie. I actually went by my old cake because that was already reduced down in complexity while retaining some of the key features such as the central mountains and the main continents.
For the continents, shape flattened little blobs of leftover green/brown turtle shell mix and affix them into place with some water. Then dab-paint them a bit of red and/or brown gel colour to add some highlights. For the mountains, make white tear drop shapes and press-smush them into place with a tiny bit of water. Drizzle thinned out green and/or brown over them and then wipe the tops clean back to white.

This doesn’t have to be perfect at this scale. Only the worst pedants would criticize an awesome 3D candy-stuffed Discworld cookie, and my rule is PEDANTS DON’T GET COOKIES.
Set the Discworld aside to dry as you start work on the elephants.
The elephants actually need to bear some weight and not fall off of the cookie. Further, given that this is a cookie, you really want to avoid internal structure, especially inedible structure. On a cake you could have the elephants hiding dowels, but here I recommend against trying to use toothpicks or even dried spaghetti as supports because you’re going to have to embed those in the cookie and that’s going to be very difficult to do without cracking it.
What’s better is to make the elephants strong themselves, and that means being made out of a single piece of fondant instead of making bodies, legs, and heads all separately. Think about it: if you’ve got to dry a body on top of legs so it doesn’t slide off, you’ll need many more days for this project, each point of contact is a potential point of failure, and you’ll have to do a lot more work.
I realized as I was typing up the instructions for how to make the elephants that it’d make more sense in a video. If you want to skip the long video, follow the photos below instead.
Mix up some grey fondant, divide it into four equal chunks, and roll them each into a ball about one inch or two to three cm big. Pinch the bottom of the ball lightly to make a sort of mushroom shape as shown in the photo below. Pinch out the ears at the sides and then a trunk in front.

First steps of making a one-piece mini elephant.
Continue pinching out and smoothing the shapes until you have rounded ears, a smooth trunk, and a pulled-out body ending in a tail. Use a blunt knife tool (or the back of a regular knife) to indent around the base to make legs, but do not cut through.

Shaping the elephant.
Put your thumbs in the ears and gently round them, pinching out the edges very thin. Roll the trunk gently in your fingers to round it and stretch it. Use a mini sculpting tool with a blunt end (or a toothpick if you don’t have the tool) to gently poke a hole in the trunk.

The elephant before details are added.
Use a small ball tool (or the rounded end of a paintbrush) to indent for the eyes, and then the same tool you used on the trunk to make indentations on either side of the trunk for the tusks. Let the elephants firm up for a few minutes but not dry thoroughly, as you need them to remain flexible for assembling the final cookie.

I should totally make some kind of horror movie with these. THE DAY OF THE FACELESS ELEPHANT ZOMBIES.
Next, make tiny white eyeballs and insert them into the indentations with a bit of water. Make tusks by shaping tiny bits of white fondant into elongated snakes and gently put them in place in the openings on either side of the trunk. If you’re having trouble shaping them, use a damp (not wet) paintbrush to help you push them where you want them to go.
Make pupils out of small bits of black fondant, dark sprinkles, or poppy seeds and stick them on with a tiny bit of water. I used poppy seeds for these ones and it gave them somewhat startled expressions, which amused me.
Finally, make super teeny tiny white balls and affix them to the front of the feet as toes. Since the fronts of the back legs aren’t seen, you can just do the front feet, or perhaps one toe to the side on the back feet if you wish.
Say hello to your four little elephants!
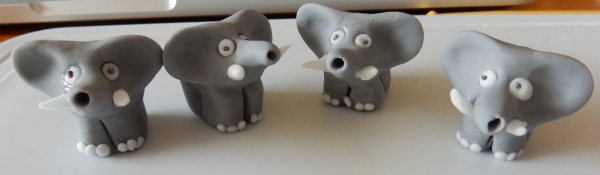
Berilia, Great T’Phon, Jerakeen, and Tubul. Did you know the Discworld elephants have names? I did…because I just Googled and found a wiki. Yay interwebz!
Now you should have your turtle, your Discworld, and your elephants all ready. It’s time to assemble everything together.
Paint the top of the turtle’s shell with a bit of water to make it nice and sticky. Position the elephants so each is facing a quarter turn differently than the one before it, as shown below:

Remember, they’re walking around in a constant circle so the position doesn’t have to be perfect so long as it’s fairly even.
Brush a bit of water between where the tail of one elephant touches the side of another. Gently press the elephants in towards each other so the tails stick to the sides. Smear a bit of the tops of the tails onto the sides as shown in the photo below. That sticks them all together which helps strengthen the whole unit.

Sticking the elephants together in a way that won’t be seen once the Discworld is on top.
Lift the Discworld cookie over the elephants but don’t set it down just yet. Give it a look over and decide which way you want it oriented, taking into account where the “drips” are relative to the elephants’ faces that you want seen. Hold it right over the elephants and look underneath to get an idea of where the ears are going to touch the underside of the cookie.
Move the cookie back to the side and make some small snakes of very moistened fondant. Smush those on the underside of the cookie about where the ears will touch. These should be sticky, gummy lumps on the underside.
Gently push the cookie down onto the elephants so the sticky lumps mush onto the tops of the ears. Give it a gentle twist back and forth a few millimetres as you push it down to help it really stick. Take care to look all around the cookie as you go and make sure nothing’s falling apart, leaning to the side, cracking, etc.
Once the cookie is in place, leave it to dry and you’re done!

All of the cookie parts assembled and drying together.
If you let it dry overnight, it should be solid enough to move around the next day. Because as we all know, the turtle moves.

Right side view.

Rear view. I particularly like how freaked out this elephant looks with his tiny poppy seed eyes.
Delight your family and friends with your epic creation!
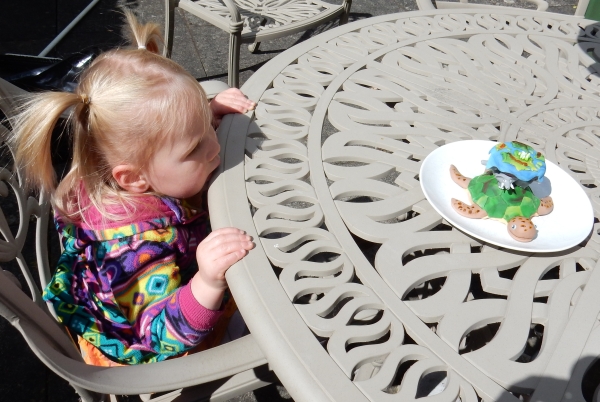
“I have no idea what this is, but I want to stick it in my face.”
And don’t forget to EAT IT.

“Hey now, why is that kid coming at us with a knife?”

Peo did approach the dissection with a slightly disturbing amount of glee.

“I felt a great disturbance in the Force, as if millions of voices suddenly cried out in terror and were suddenly silenced. I fear something delicious has happened.”

Who knew space turtles have mini Smarties for guts?

Slurrrrrrrp!
(I’m now having eerie memories of playing Violent Venable in a high school production of Suddenly Last Summer.)

We gave one of the elephants to Robin.

She hugged it. D’awwww.

She ate the Smarties but kept hugging the elephant, completely not interested in eating it.
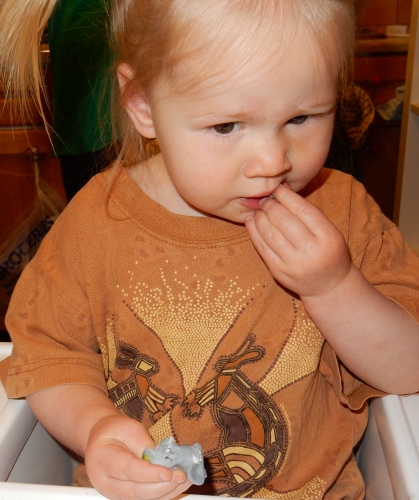
But then eventually she gave in and ripped its face off.

And then decided sugar elephants are not tasty, so she threw the rest on the floor. Poor elephant!
Now go forth and make your own Discworld cookie! Then rip it apart and eat it! BOOYEAH.


OMG!! That post is epic! I laughed, I cried, I got really hungry… Everything you want in a post. The cookie is amazing, I love kids because I don’t know if I could of dove in with such enthusiasm, lol. Let me know when the zombie elephant movie come out, I’m buying tickets!
Thanks! And that movie NEEDS TO HAPPEN. 😀