
In February of 2017, I submitted two entries for the Austin cake show: a sewing machine made out of cookies and a miniature set of figures with a Resist sign. The sewing machine scored First Place in the Cookies – Masters Division and the Resist figures didn’t place in Special Techniques: Not on a Cake but did receive a good score nonetheless.
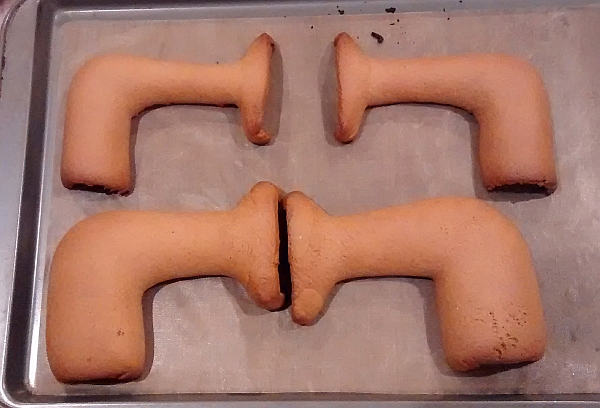
The sewing machine was comprised of nineteen cookies in total: six for the base, two hidden in the base as supports, two for the curved arm, one for the faceplate, one for the gear, one for the wheel, five for the spool, and one for the handle. The handle wouldn’t fit on for transport, so it’s only seen on the photo at the actual show:

On the judging table at the Austin cake show.
The cookies were made using Julia Usher’s “construction gingerbread” recipe from her book Cookie Swap, but with some adjustments for UK flour being softer and substituting other UK ingredients such as golden syrup for corn syrup.
I looked up several types of vintage Singer sewing machines and found pictures online from various angles so I could build myself a template for all of the parts, but I also knew I had to fit it into a box to take in carry-on luggage on an airplane. So I made the base box smaller than most Singer models relative to the arm, which I couldn’t make much smaller without making it difficult to scale down other portions as well.
For the box parts, I rolled the dough to 1/4″ thick and cut the pieces using my template, then baked them, and once cool I filed the edges flat with a microplane grater. Also, when the top was still warm from the oven, I pressed the top side of an oval cutter into the surface where I knew the arm would go, so that it would have an indentation to rest in for greater stability.
I assembled the box pieces with thick royal icing, including two hidden round cookies cemented in under where the arm would be, so that later I could put two wooden skewers down through the entire assembly, knowing there would be plenty of cookie material to hold them. Those two arms would keep the sewing machine arm from tipping, twisting, or shaking itself off during the 10-hour plane ride from Heathrow to Austin.

The box base construction, showing the indentation and skewers ready for the sewing machine arm. The upper surface is actually the underside of that cookie. I placed that top cookie upside down so the flattest surface would be on top.
I sized the photos I’d found to fit my overall design and then printed out sections so I could cut them out to make templates. In particular with the arm, I did a side and top template and then made foil supports to fit inside them, knowing the thickness of the dough needed room on top of that as well.

I made half of the arm support sized to the printout, allowing room for the dough on top for the final result.

Then I made the mirrored other half, using the top-view printout to get the curves and thickness right when the two pieces were held together.

Even though they look wonky on their own, I did ensure that the pieces fit well together so that the resulting cookies would as well. The seam didn’t need to be perfect because I knew it’d be smoothed with royal icing and covered with fondant, but the pieces needed to meet completely along all edges.
At first I rolled more dough to 1/4″ thick for the arm pieces, but they came out way too big like that, so then I rolled it much thinner (my guides are 1/4″ so I guesstimated about 1/8″) and those second pieces worked much better.
The first attempt is on the bottom, the second attempt – which made it to the final piece – is on top.
I then filed rough edges as necessary and assembled the arm pieces with royal icing, keeping a hole in the seam on top for a skewer that could support the thread, and another in the back for a skewer that would support the wheel mechanism. I also kept those holes marked as I covered the arm section with black fondant and rubbed out all of the seams so it looked like one whole piece.
The rear wheel was also made over a foil form because although I have several half sphere cake pans, I couldn’t use anything with a crimped lip (because the cookie would get baked into it and stick), and although I do have some silicone half sphere shapes, none of those were the right size. So I made a solid foil half sphere of the size I needed, cut a round cookie, used a mini square cutter to cut holes evenly around, and then draped the cookie over the form with a flattened, flared-out edge at the bottom.

The squares baked into angles. I initially started filing them with a tiny file, but realized I was likely to break the piece so I just left them that shape.
When it and the other cookies that needed to be silver were cool, I painted them with a mix of Albert Uster Highlighter Silver Dust and confectioner’s glaze. That dust is a “decorative use only” but the Austin show allows such dusts, and obviously nobody was going to eat this piece. If I’d been making this for a British show or if I was making this to be eaten, I’d have used a silver marked as “edible”. Either way, mixing it with the confectioner’s glaze skips the need for alcohol and makes it stick to the cookies in a nice, thick coat that doesn’t rub off. If you’re going to use this technique, keep in mind that the result might be slightly sticky if you are in a humid environment. I sprayed these pieces with some Dinkydoodle Spray and Shine just to be really sure that they were both shiny and secure.
Once the base box was also covered in fondant that I painted with a woodgrain effect plus the black top panel, I made a mound of very sticky fondant over the skewers on the base and mounted the arm on top. I then pushed another skewer through the front of the base so it was sitting flush against the head of the arm. I’d already carved out a thin indentation in the middle of the back of the faceplate cookie to about halfway up so I could then use thick royal icing to mount the faceplate onto the arm head with the skewer that would look like part of the foot mechanism. This plus the two skewers hidden inside the fat end of the arm made the whole thing very stable. Once that dried I was able to feed a skewer through the back hole of the arm, through the length of the arm all the way to the faceplate, and mount the fairly heavy gear wheels, and it was all counter-weighted and self-supporting.

The initial assembly coming together.
The thread spool was made with three small round cookies stacked together with royal icing and then two slightly larger cookies on either end. The end cookies were dipped in marbled royal icing with light brown and yellow so it created a subtle wood-grain effect. Once the assembly was dry, the three interior cookies were covered with white gumpaste textured to look like thread. When it was all dry, I mounted it to the top of the machine with a small bit of skewer through the hole I’d preserved earlier, and affixed it with a small softened bit of black fondant so as to blend in with the machine arm. I also added a tiny gumpaste spindle coming through the top.

Five cookies make up the spool.
I did consider making a thread out of flexible chocolate or something else that would resist breaking on the trip, but realized that anything I could make strong/flexible would be too thick for the scale, so I left the machine unthreaded.
The handle was also dipped in the marbled royal icing. I made a lump of a cookie, used the microplane grater to shape it into the tapered shape, mounted it on a toothpick, and dipped it into the swirled icing, then mounted it sideways into styrofoam to dry, turning it every few minutes so it’d stay even. Here it is on its own since as mentioned above, it couldn’t be on the piece until the show in order for everything to fit in the shipping box.

I originally intended to do a lot of detailed work on the faceplate since some of the classic Singer faceplates are so ornate, but I was running out of time so instead I just airbrushed a stencil over it. It’s not as nice as I would have liked but it was acceptable.

After that it was all about the tiny details. I didn’t replicate every bit of a real sewing machine, in part because I myself don’t know what they all do. So I added what looked like the main levers and knobs, the bits that make up the foot and sewing part, plus the Singer seal. I painted the supportive skewer in the front silver to blend in with the sewing assembly.


The seal and all of the gold lettering and details are painted with Rolkem Super Gold, which is considered edible in the UK, EU, and Australia, but not in the US. This regional weirdness with what’s edible or not is something we talk about a lot on the podcast!

I don’t know what that lever does, but it’s obviously important so I had to include it. It was the most fragile part of the entire piece, made in gumpaste but sticking out and just begging to be broken. I am glad it stayed intact!
The gilded bits on the box were fudged from several Singer designs. I originally found and printed off the graphic of a sticker set you can buy if you’re refurbishing one of these machines, but at the small scale the pattern was too intricate. Also, the pattern in the middle ended up more angular because it was just so difficult to get my brush in at the right angle. If I made this again, I’d paint that whole base before putting the arm on so I could do a better job.


Showing the small size of the entire piece.
All in all I was fairly pleased with how it turned out, and obviously so were the judges!
At the time I was making it and planning to travel back to the US for the show, the news was erupting with Trump’s travel bans on Muslims. Now, before you say, “Hey, this isn’t a political blog!” remember that basic human rights are not politics: they’re basic human rights, and some people were being denied basic human rights because of their religion. I read stories of mothers separated from small children at airports and put myself in their shoes, imagining their terror at these sudden and illegal discriminatory practices.
As a caucasian triple citizen (Canada, US, and UK), I travel pretty easily anywhere I want to go. I am very privileged in that regard. I sail through fast-track customs lanes and nobody ever gives me any grief.
I decided that if I was going to go back to the US, I was going to stand shoulder to shoulder with my Muslim sisters even though I am personally an atheist. My family and I talked about it and we decided it was worth the risk for me to highlight the inequity going on by me bringing a secondary entry through customs deliberately designed to provoke a response by those seeking to silence the justified outrage at the travel bans and more.
So I made a very tiny miniature set of two women holding a sign that says, “Resist!” with their fists in the air.

The whole thing was only a few inches wide.
In the end, it turned out Austin was a Sanctuary City and airport staff weren’t enforcing the illegal ban anyway, so it was moot. Nobody stopped me or asked me questions about the piece at all. But I at least tried to put myself out of my privilege to highlight an issue, and then turned the focus on ensuring the piece was useful to promote human rights.
Every part of this piece was a calculated, intentional depiction of elements of social justice protest. The faces are deliberately not “pretty”, nor traditionally “feminine”. The hands are slightly large for the scale, but one has nail polish. Someone commented at the show that one of them looked “like a guy” and I responded, “How do you know either of them isn’t trans, or just more traditionally masculine looking? They’re not here to be pretty for you. They’re here because they’re really angry.” That other person was taken aback for a moment but then nodded and said, “Okay, I see what you’re doing there. That’s cool.”

Are their fingers overlapping randomly, or are they in a relationship? You can’t tell, and really, it’s none of the viewer’s business anyway. Their home life is irrelevant to the fact that they are justifiably angry and protesting for everybody’s rights.

There are toothpicks supporting one leg each and the sign, making it a very stable structure.
The pavement was made with my usual method of mixing bits of dried fondant/gumpaste (whatever I have on hand) in various grey to black tones into lighter grey fondant, with very granular sugar mixed in as well. I then press in extra sugar on top and sweep most off for texturing and to give the pavement a bit of sparkle.

Use granulated sugar to give pavement a realistic sparkle.
The rest of it is a combination of gumpaste, a bit of modelling chocolate for the scarf, and royal icing for the Afro hair.

Overall even though it didn’t place or get attention at the airport, it did generate a lot of conversation at and after the show so I’ll take that as a small win for highlighting human rights issues.
A lot of people were also curious about how I got the pieces to the show intact. I devised a padded, boxed system so that they’d be safe even if the boxes were bumped around or turned on their side; and to my horror the security at Heathrow did in fact turn my carry on bag on its side to go through the x-ray, with both pieces inside! But they survived because of this system.
I used sturdy food tubs turned upside down, so their lids could be bases onto which the pieces could be firmly affixed with packing tape. That would let me get them off at the show, but hold them down otherwise. For the mini piece, I just taped it directly onto the lid of a small tub, then snapped the tub bit over as one would do with a cake carrier, plus a bit of loose plastic wrapped around in case it came off of the base. But for the sewing machine, the only tub that would fit had a recessed portion to the lid, plus I wanted more shock-absorbtion and side-to-side control.
So I repurposed a bunch of leftover padded envelopes from Cake Bag (a wonderful random-cake-tools-per-month subscription service), cutting them into pieces to tape around the indentation on the tub lid, building up a firm but padded base all around.
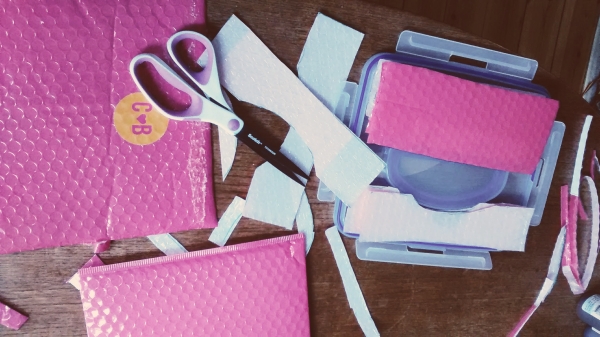
Cutting up the padded envelopes and putting them in place on the inside of the tub lid.
On top of the padded envelopes I mounted a small cardboard box with the bottom cut out precisely to the shape of the cake board underneath the sewing machine. That way, the sewing machine would sit on the padded base (taped down with packing tape underneath) but with a thin fence all around holding it securely on all sides by the baseboard, not touching the actual fondant or gingerbread. I also then put toothpicks around through the cardboard box down into the bubble packaging and wove plastic wrap around those toothpicks, creating another emergency padded-yet-firm barrier in case the base came loose and it moved around the tub.

The cut-out cardboard box frame with the exposed Cake Bag envelopes underneath. This was taken after I came back, so you can see the packing tape that had held the piece in place.

The piece sitting in its cardboard frame. You can see how the cardboard only touches the lower part of the ribbon, which is hiding the cut-to-size cake board under the whole thing. So the supportive cardboard is only bumping more cardboard, not fondant.
I then put both tubs in my carry on bag that I already knew fit beneath British Airways seats (with some room to spare). That way I’d be in full control of it, nobody would be moving it around an overhead compartment, and I could keep it secure at all times. Luckily the flight was less than half full (it turned out those travel bans put a lot of people off trips to the US!) so I had the row to myself and moved it to under the middle seat while I sat stretched out in my window seat.

The pieces packed up and ready to go in my carry-on bag.
All in all it was a very successful trip with pieces I’m quite proud of, packed well with a lot of planning and forethought.
Here’s to hoping my plans for the 2018 Austin show go as smoothly!


As an intersectional feminist and seamstress, these are pretty much my favorite pieces ever!
I haven't played around much with old machines, but my guess is the lever on the back is the one that moves the foot unit up and down so you can get the fabric underneath it.